Monday, February 21, 2011

Pot Holder

Several years ago, ma bought me an awesome pot holder. Instead of fastening to the ceiling, it attaches to the wall. Only problem is, it's at least thirty inches long, and there aren't many kitchens out there with that much wall space.

Fortunately, this house is one of them.

Well, it was. Our fridge was a side-by-side. Which means that the door swing didn't take up much floor space. But because the freezer side was right by the wall, access was ridiculous. We couldn't even pull out the ice bucket. After listening to me whine for 3 1/2 years, Tom found a slightly-damaged, stainless steel, bottom-mount freezer for a wicked-good deal.

Which meant that we could finally fit a full-sized pizza, but we had to take down the pot rack. Which meant that we had no place for our pots.

I finally decided to get bathroom robe hooks. The bottom part could hold the pots, and the top could hold the lids. But, after we got to Target and looked around, I found something even better--heavy-duty picture hooks. They were narrow enough to fit in the hole in our Teflon pan handles, and sturdy enough to hold the pots up. The skillets still got hooks, since they're more visible.


The pan just to the right of the microwave is the pan the Creature uses to make eggs and rice, so it needed to go near the bottom. It let to an inadvertent cascade effect.


The little sauce pans didn't really fit, so I put them by the spice rack.


Looks pretty okay with the new fridge.

Saturday, October 2, 2010

Floor Joists and Paint

What an exciting title! I bet you're on the edge of your seat just reading it!

So, yesterday, about the time I was about to tell JT that I was going to lie down for a few days, he says to me, "I wanna work on the fort." My evil plan worked! Ignore the fort until he gets the hankering. Wonderful timing, kid.

The next step was to hang the floor joists. And, yes, I mean hang. I got joist hangers. I can't toenail a stud to save my life, and I knew I'd never get the cut precise enough, anyway. I cut the joists and he hung them--with a little help.

We were short two joist hangers because I decided to use a pair for the porch. That way, all the weight would be on the cantilevered beams and not on the screws screwed into the cantilevered beams. The porch is only two feet beyond the posts so we shouldn't need anymore support. I think.

Today, we dropped off the truck for a oil change, went to breakfast and two bookstores, then to the Land of the Orange Aprons. JT actually wanted to sit and read instead of look at things. Anyway, we got hardware for the window (including wood hardener--which then leaked all over the formerly-reusable shopping bag), two joist hangers, and a $5 gallon of flat black paint from the oops rack.

Sorry I don't have pictures, but after I cut the last joist JT put it in all by himself. (It got stuck, so I did turn it around and pound it into place with the hammer, but he did the rest.) He painted while I hand-sawed off the top of two of the posts and fixed one corner. I'll saw the other two when my arms have recovered and there's not wet paint to catch the sawdust.

I think I mentioned he wants to paint the whole thing black and red. Still, I thought black framing would be all right. And it's always best to paint wood that will be exposed to moisture and bugs. So we did. Tom even came out to help toward the end.


Yes. We were that tired. In fact, JT asked if, after painting, he could take a nap. Once finished, we got the truck, went to a hibachi restaurant to celebrate, and JT put himself to bed.

Next step: strip the old (probably lead-filled) paint off the window, slather it in wood-hardener, go to the salvage shop to look for flooring. This thing just might be done by first snow!

But I wouldn't count on it.

Saturday, September 11, 2010

The fort and Breckenridge


JT's sunflower about a week ago.

Yes, it's been a long time since the last post. Sorry about that. I was overwhelmed with considerations for the framing of the roof of the fort. Finally, I realized simple is sometimes best. Then I realized I couldn't do it alone. And by "alone" I mean without someone else over the height of 5'.

But before that, we did have help. Rent-a-Kid is the daughter of friends of ours from before we were married. She used to come over once a week. She moved to Louisiana the beginning of the summer, but stopped by for a visit. Poor kid arrived during the most boring chore imaginable. Yes, she helped JT lay landscaping fabric down under the fort, then cover it with river rocks from the other side of the yard. She's nine; at the time JT was eight. They didn't exactly cover the whole area. But they didn't whine too much, either. Sadly, I didn't get a photo.

While I was mulling over the roof framing, we had company (my best-friend-from-Hawaii and her son) and went on a couple of trips. One of which, over Labor Day, to Breckenridge. When we're rich and famous, we're going to live there during the summer and live in Washington during the winter. Sounds backwards, I know, but it's too cold in the winter, and we can rent it out to skiers.

We went on a

where we followed


and saw

and


We also discovered that if you need ski gear, Breck on Labor Day weekend is the place to be. Between a ski jacket, a helmet, gloves, a sweater, and hiking boots, we saved more than we spent on our friend's condo.

That was last weekend. Today, my darling husband, known in parts of the blogosphere as Maj Tom, agreed to help with the fort. It was quite a sacrifice on his part. Our neighbors had free tickets to the USAFA/BYU game (in which the Falcons won handily) and, if that wasn't enough, it was televised.

A few days ago, whilst helping JT with homework, I grazed the dining room light with my head. It didn't hurt, but I jerked so hard I wrenched my back. I knew that a day of construction would do it in, but I didn't have a choice. It's the beginning of football season. Maj Tom would soon be lost to me until spring. So we got supplies and got to work framing the roof.


He claims he's not handy. I didn't care. He's 6'. And, I have to say, working with a 6' man and a thrown-out back is infinitely easier than working with a 3'10" eight year old. I'm just saying.

While framing, I discovered the fort is even more creative than I'd thought. The right side is six inches shallower than the left. I have no idea how that happened. I bet you couldn't tell before I said that. Pretend that it's square, whouldja?

Next is getting panels for the roof and putting in the floor. We also need to frame in the roof for the porch, but that won't be too much drama. With any luck, we'll have it walled in before the first snow.

But I think we'll paint it just in case.

Saturday, July 24, 2010

Rockin' the chores

MangyCat is an old friend I used to work with about ten years ago. I love that I'm back in the same town with her, even though our schedules don't allow a lot of time together. She has a girl a bit younger than JT and a boy a few years younger than her girl.

She recently came up with a great idea that combines chores, money, treats, and TV time that I enthusiastically stole.

Her method is simple:

Each kid can earn 1 token by doing any of the following:

* Read for 15 minutes
* Do a specified chore
* Complete 4 educational worksheets

If they work well or read together, they can EACH earn a token for the SAME chore or reading time.

They can trade in 1 token for:

* 30 minutes of TV
* 25 cents
* 1 tally-mark toward buying How to Train Your Dragon on DVD (60 required)


(Stolen from her blog.)

Because JT is older, I modified it slightly--for one thing, we went to Hobby Lobby and bought rocks instead of poker chips. Not that there's anything wrong with poker chips. We just didn't happen to have any, and I wanted something we could display. We just started the program today, so I expect it will go through several transformations.

Ways to earn a rock:
- Half hour of reading
- Finish one subject of homework for the day
- One designated chore (clean room, vacuum, pick up poop...)
- Morning chores complete: feed/water dog, make bed, have a clean desk--WITHOUT BEING REMINDED!

Ways to spend a rock:
- Fifty cents
- Half hour of TV
- One X-Box game

He can also lose rocks:
- Too many chore reminders
- Too much whining about above


The rocks come out of the horse pitcher and into his vase. Day one: one rock earned for reading; one rock earned for chores. One rock spent on X-Box; one rock lost for whining.


As Fezzik said to Inigo, "I hope it works."

Monday, July 19, 2010

Header

Well, technically, since this is sorta a post and beam structure, I guess this piece would be called a girt. It's the horizontal member that supports the gable end of the roof. But we're nothing if not wingin' this puppy, so feel free to call it a header or a top plate or a roofie-thingy.

As I may have mentioned before, it proved exceedingly difficult to screw in a treated 2x6 eight feet above the ground with an 8-yo holding the other end. Other adult help was scarce, so I realized the best course of action was probably to use a cleat.

French cleats are used to hang heavy wall cabinets. This wasn't as elegant; in fact, it could probably more accurately be called a jerry-rigged bracket. First we found a piece of scrap 2x4, then a piece of scrap 1x4. Then we nailed them together:


Then we nailed them to the post where the header/girt/thingie needed to be supported:


(This is a pic of JT holding the cleat/bracket up after we were done because I forgot to take a picture beforehand.)

Once it was up, I realized the 1x6 would probably stay on better if it was screwed and not just nailed. So I did that.

Then I hoisted the 2x6 onto the bracket. I decided to nail the other end first so I wouldn't have to hold it up while I was trying to screw it in. Then I put the first screw in. It was very, very hard. That end must have had a knot or something. Before I could get the screw in all the way, the cleat came off and the 2x6 fell onto my shoulder. (It didn't fall very far. In fact, my shoulder was right underneath it. But my shoulder was also about 8 inches from the fulcrum of an 8-foot board, so it wasn't entirely pleasant.)

Wherein our heroine realizes she's an idiot and screws the cleat onto the post.


But, in the end, it worked. The right end of that stinkin' 2x6 was so stinkin' hard I had to drill pilot holes. And I didn't let JT up there for fear it would fall on his head. (He can go to town when we put in the floor.) And it was still so hard to hold up the board while fastening it that it dropped a little and turned out to be not quite level.

At this point it felt like it was about 95 degrees. I know it wasn't because right now it's noon, and it's only 90. But it just felt miserable. Weather.com promises the rest of the week will be cooler, so we called it a day--but not before JT had the brilliant idea of putting our gear in the shed instead of putting it carefully away in the garage where we'd have to make 78 trips to get it again.

Told you he's smart.

Much to his dismay, there was still worksheets to be done. I split up the different types of walls into solid (stone, adobe, log cabins, Earth Ships, etc.) and "frames with something covering it" (tepees, yurts, post and beam, stick-framed). He did solid walls today, and it went much better than the foundation assignment.

"Why?" you ask. Maybe because his mother finally got bright enough to go through the pages with him instead of making him read them on his own. He started out level-7 crabby and ended up goofy. And did really well on his assignment sheet, only taking about 20 minutes to do it, and correcting his mistakes fairly easily. Yea!


My attempt, here, isn't to make JT a residential architecture expert in one summer. I'm trying to combine something he loves--construction--with something he struggles with--reading comprehension. I'm also learning what he needs to understand what's being said. Today, to understand what a stick-framed house and what a continuous foundation are, we went into the garage and looked at them. I'm already impressed by the respect he gives tools and the care he takes around the site.

In the future, worksheets will include:
- "Frame with something covering it" walls
- Types of roofs
- Types of floors
- Tool care and site safety

I hope we can get all this done--he only has five weeks left until school starts again.

We also realized yesterday that the flooring sample tiles my boss gave him could be cut to a standard size and glued onto a table top to make a great chess board.

Things I learned:
- I really should look into using lag bolts.
- I really should look into getting a laser level.

One last thing. After working on the fort last Thursday, JT decided he needed some work boots. Volume didn't have his size, but Target did. He's terribly proud.


(He's also in absolute awe that his mother could cut the sleeves off a t-shirt to make a tank-top and cut the legs off some old jeans to make shorts. And yet he expects me to make his fort lickety-split.)

Thursday, July 15, 2010

Frame I

I had two huge worries when we started this project. Well, besides money. And besides getting so frustrated that I'd just up and quit. The first was setting the posts into the ground. The second was framing the roof.

Happy to say, the first worry has been taken care of.


JT's best bud came today for a playdate. If there's anything more challenging than trying to construct a fort with one whiny little kids it's...Well, you get the picture. Strangely enough, JT looked upon his friend's attitude and altered his own. Maybe because it was his fort. Maybe because he saw how annoying he could be. Either way, it was really nice working with him today.

In other news, toxic-chemical-soaked 4x4s, toxic-chemical-soaked 2x8s and 2x6s (toxic chemicals are heavy), one seven-year old, one eight-year old...I know it's not all square and plumb, but it's beautiful to me! I couldn't get the top plates on because they were too heavy for me to hold up and screw in with the 8-yo tentatively holding on to one end. Hopefully the man can help this weekend.

One alteration we made is visible in the front. The fort is supposed to be 8'x6', but 2x6s don't come in 6' lengths. The plan was to screw the suckers on and cut them to fit. But, once they were up, we realized they'd make a great porch. Of course, the entrance is supposed to be on the side, but we can rig a sliding panel (ala the myriad livestock gates I made with my uncle when I was in high school) on that wall.

The post ends are also not level. I really didn't see how it was possible to dig holes and make measurements such that I could cut them to size before they were up and attached. I'll have to go up there with the jig saw once the top plates are up.

We were out of wood and patience, so we called it a day. Since then, I've spent the last couple of hours writing a chapter on the different types of walls. Stone, masonry, dob, sod, timber-framed, stick-framed--who knew there were so many? I haven't made up the worksheet, yet. I need to make sure it isn't too overwhelming. Maybe I can present it in stages--tents and solid walls, then timber-framed and stick framed.

But the next step is to get JT some work boots. He's been asking for some, and I'll do about anything to keep that good attitude going!

I am seriously beginning to look forward to the day JT goes to college and I can claim the fort as my own.

I just have to figure out how to frame the roof.

Wednesday, June 30, 2010

Fits and Starts

Work on the fort has been touch and go. Monday we tackled the ground-breaking. JT discovered that breaking ground is stinkin' hard work. We cleared off the grass and dug two post holes and called it a day as far as physical labor goes.

That doesn't cover the drama. JT's never been diagnosed ADHD, and if he is, it's probably fairly mild, but boy-howdy, Monday was a pain. Every two minutes I had to tell him to get working. Yeah, it was hard, but so is a lot of stuff he's happy to do without problem. I was tired, it was hot, my allergies were acting up, and he was under the impression that if he quit working, I'd do it for him.

After the millionth shoulder-droop-sigh-of-despair (you know what I'm talking about?), I sent him to his room and told him that for the next half-hour he needed to write about his fort to his grandma. I went up there half an hour later, and he was twenty minutes into a new Lego creation. Which he spent the rest of the day frustrated with because the Legos hated him and wouldn't stay together. I seriously considered taking the Legos away, but I figured that was punishing me more than him.

At least the yard looked all right.


I sat down at the computer and came up with a worksheet on four different types of foundations. He had another sheet of paper's worth of questions to answer. Here's the source material:


Here's the sheet of questions:


Guess how long it took him to finish. (Hint: three hours!)

He was frustrated, I was frustrated...I decided something needed to be done. So I called the base clinic to set up ADHD screening. Guess what. They won't screen for ADHD unless the parent can get an education professional to fill out the forms as well. So, if I wanted to take time out of the school year to do this, or if I worked full time and sent him to after school care, or if I worked even part time and sent him to a day care, they would talk to me. But the fact that it's me that's home with him all summer and every day after school means they can't do anything until school starts.

I still hold that I did not hang up on the lady. I hung up on myself. If I hadn't, I'm sure the nice lady would have immediately transferred me to mental health.

Tuesday, my wonderful friend, Evangeline Denmark, called and requested JT's presence to entertain her Chunky (who isn't) and Monkey (who is). I was able to have a relaxing lunch with my husband and our friends who run gotquestions.org. Then I brought JT home, I went upstairs for a nap, and he got on the internet without permission.

The screensaver now has a password.

And Evangeline said it was the most relaxing day she'd had in a while.

The in-laws come tomorrow, so today was dedicated to getting the house in some kind of order. JT helped as cheerfully as I know he can. Late morning, we went for a bike ride wherein we saw this:


We came home, ate lunch, and started work on the backyard. All the sod we'd pulled up had been drying under the tree, so JT stuffed it into bags and hauled it to the gate while I edged, mowed, and weeded. That was enough work for one day, so we hied ourselves to the nearest Josh & John's wherein I partook of chai ice cream (kinda bland) and he got chocolate chip (yummy!).

When we got home, he reminded me we hadn't hung up his dying-zebra-baseball-rack. So we did.


The child then spent the next two hours creating a new cover for his driver. At first, he tried to embroider a "6" onto a slipper-sock. (Not that his club is a 6-wood (is there such a thing?), but the original, lost, cover had a "3" on it and I guess he thought 6 would be twice as good.) When the thread proved to be uncooperative, he just did this:


Two hours. Happily sewing onto slipper socks. I don't get him.

At least he's cute.


Meanwhile, I'm hoping his grandpa will help me set the posts for the fort. 'Cus I don't think I'm going to be able to do it with just JT.

And, yes. I know his shirt's on in-side-out.

Friday, June 18, 2010

The Bar

JT has been extraordinarily self-entertained the last few days building a Lego monstrosity called the "Combinatron 16,000." Sadly, the creation met an untimely death in the bottom of a cold, hard bathtub, but it gave me time to finish a project that was long overdue.

Over a year ago, a neighbor set a six-foot long base cabinet and its matching wall cabinet out on the sidewalk, free to a good home. My husband has been wanting a bar in the basement since we bought the house three years ago. I'm not sure why, since his idea of the perfect mixed drink is hot chocolate and Bailey's. Instead of going down to American Furniture Warehouse, plunking down $300, and getting a pine bar that matches our furniture, I decided to take this base cabinet and...dress it up.

First off, I had to chop several inches off the length. There's only one place we can really put it, and it would have blocked the path to the laundry area and bathroom. JT and I pried one side off, cut about fifteen inches off the top, front, and floor, and reattached the side. We also had to cut a few inches off the bottom, as much of the wood had rotted. Then I built up supports and put casters on the bottom in such a way that it's moderately easier to move the behemoth. The side that was cut from is no longer wide enough to fit the drawers, so I moved them under the left side drawers. The new plywood/backerboard top is screwed in from the bottom so the table top should come off from below. The steel kick-plate is roof flashing I'd used for a kitchen back splash in a previous house, and the paint's all left overs from living room. HD had a sale on slate tile, so a friend and I slathered on the thin-set and put them on.

And there it sat for half of forever. We used to have a real-live lumber yard when we lived here before, but it's gone as HDs and Lowes have sprung up in every neighborhood. I had to dig to find the red oak trim to match the original cabinet. Then I had to dig several months to find the motivation to put it on.

Two days ago, I did. Yesterday I went back and fixed one side, stained it, and grouted the tile. I still need to slather the trim with polyurethane, but it turned out kinda nice.


The slate and the trim. Next time, I need to use spacers between the tiles.


The finish was almond melamine. A strangely cheap-looking finish for a cabinet with oak trim and cool, retro hinges.


I didn't realize the trim reveal on the sides is different than that in the middle when I put in the back rail guide for the moved drawers. It makes them a little off, but the rail was so hard to get out and put back in that I left it. I had hoped to put a mini-fridge in the cubby on the right, but it's proving difficult to find one small enough to fit.


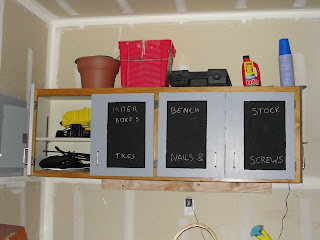
Long before the bar was finished, the wonderful guys who carried it into the basement also hung the wall cabs in the garage. I covered the melamine with garage floor paint I found in the oops rack, then a square of chalkboard paint.


One side holds saws and odds and ends. The other has bench stock (consumables like screws, nails, wood glue). The end got a bit of peg board for some of my g-pa's old tools.


Cool hinge.

Thursday, June 10, 2010

Baseball Rack

We put the baseball rack together today. I think most of it will stay together, and JT had fun.


Measuring the sides


Drilling pilot holes


Attaching the mitt and hat brackets

We did go back and screw them in from behind, but I am not convinced these will stay on. When they fall off, I'll replace them with store-bought hooks.


Finished rack

Balls on top, mitts and hats in the middle, bats and bat bags on the bottom.


Painting on the primer

Afterward, he put on a coat of red. He wants go back and paint in black stripes. He also wants brown. Sadly, his mother wants something slightly less violent. I'll let him paint in the black, but brown? Really?

Tuesday, June 8, 2010

Construction

No, not on the fort yet. I need to be in a frame of mind wherein I'm willing to dig four post holes pretty much by myself and square up the posts. Probably next week.

JT recently joined Webelos, the thing between Cub Scouts and Boy Scouts. It is my great hope that his dad-the-Eagle-Scout will do the boring memorization things with him and I can do the cool stuff.

To wit!

One of the projects was to build a catapult. There were even instructions in the new nifty Webelos book we got. Of course, I'm allergic to instructions, so we used a shoebox instead of a milk carton and chopsticks instead of pencils. But it works!


He wanted to build a birdhouse next. Bor-ring! One of the recommended projects was a really simple shelf. I decided to up the ante and build a baseball equipment rack. He heard my description and ran for his safety goggles.

This is good practice for the fort. He got to use the jigsaw for the first time and both drills (because I'm also allergic to keeping the cordless drill's batteries charged). He liked the drill, except when we had to use the doorknob bit. He was less impressed with the loud jigsaw. We eventually put him in his batting helmet and that helped minimize the noise.

He also learned such basics as unplug the drill before you change the bit, look what you're braced against so you don't saw through something you don't want cut, and--for pity's sake!--stop stepping on the equipment! Oh, and everybody hates sanding.

I didn't take any pictures as I was too involved trying to prevent the sudden loss of fingertips. We cut out all but the sides of the rack, and I'll take some pics as we put it together. Please don't expect to be impressed. I am not a carpenter. I can't even guarantee it'll stay together.